I am a member of the West Middlesex ARES group here in Stow, MA, and we’ve been working on increasing our readiness to do emergency communications using digital modes. This makes sense; if we’re sending information during an emergency, we want to make sure it’s delivered intact and without errors, and digital communications modes are made to do that.
There’s only one problem: the ham Emcomm community has pretty much standardized on a program and protocol called Winlink. That’s short for “Windows Link.” And I run my ham shack with a M1 Mac mini.
Now before everyone says “Just go buy a $99 Windows laptop,” I’ll note that 1) I helped configure one of those for our Emcomm setup at the fire station so I’ve been there and done that, and 2) I don’t want to put up with all the hassles that come from running Windows operationally, especially during emergency ops. So I took it upon myself to come up with a Mac solution.
Now, if you’re a Mac person, you probably also know there’s a virtual machine emulator for the Mac called Parallels. I own a copy of Parallels and, when absolutely necessary, I run whatever Windows software I need on it. Unfortunately, however, Parallels doesn’t currently quite get you to a working Winlink implementation. Parallels on the M1/M2/M3 Macs runs the ARM version of Windows, not the Intel version, and the serial port drivers are just different enough that Winlink Express (the most common Winlink client) can’t properly do rig control of my radio. And equally unfortunately, Winlink Express doesn’t allow rig control using a network rig daemon. The bottom line is that I needed to find another solution besides Winlink Express. And besides, the idea of dragging along a copy of Windows just to speak a radio network protocol just feels wrong.
So I’ll just cut to the chase: I have a working Winlink system that runs natively on my Mac. It includes a full Winlink client (including forms creation and display), support for ARDOP and VARA HF modems, full rig control for a wide variety of rigs, and it doesn’t require a virtual machine. The client I use is called pat, which runs natively on the Mac, and the modems run using a version of WINE called Crossover.
However, before I get to how you can install this for yourself, I’ll provide a little background based on the reverse engineering I had to do to get this to work.
Wait: Why Not Just Use Winlink Express?
Winlink CMS Express (that’s it’s full official name; I typically just call it Winlink Express) is an Intel instruction-set Windows-only program. While Winlink Express runs just fine in a virtual machine under Parallels on an M1/M2/M3 Mac, it doesn’t work with Parallel’s ARM-based serial port driver for the radio. I spent many hours trying different configurations for the serial port and ended up concluding it’s just broken at the moment with Parallels 18 running Windows 11 ARM.
What about the WINE and Crossover systems for running Windows apps? Again, Winlink Express launches and runs just fine under Crossover 22.1.1 (which successfully supports all the appropriate Intel-to-ARM translation), but is unable to launch external modems such as VARA and ARDOP successfully in that environment. WINE now claims to support Apple M-series processors, but just as with Crossover, it requires a bunch of old and largely deprecated Windows DLLs to be installed and configured just right using winetricks to make the modems work. Finally, because Winlink Express was never meant to be run under WINE, it can’t properly launch the modem programs.
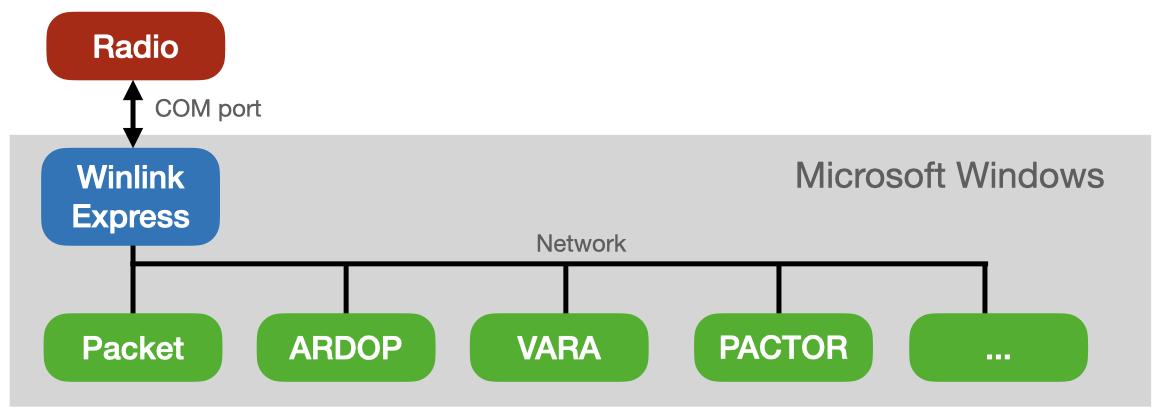
In the end, Winlink struggles on ARM Macs because it insists on using a serial port to control the radio, and it calls modulation programs like VARA and ARDOP assuming that they will control the radio using that same serial port (see Figure 1). Needless to say, that view of how to work with the radio becomes problematic without a good serial port driver.
The good news is that the process I describe below will allow you to run Winlink CMS Express under Crossover. However, because Winlink Express invokes the radio modems with some options that don’t work properly within the WINE environment, the only session that Winlink Express works with under WINE and Crossover is telnet.
Why pat for Winlink Is a Better Solution
For those unfamiliar with it, pat is another client for the Winlink network that takes a more Unix-like approach to running Winlink. Pat focuses almost entirely on the user interface portion of the Winlink client (aided by your Web browser) and lets other programs handle the modulation and radio control tasks. It communicates with those programs entirely through network sockets. Best of all, pat is cross platform and can run on Windows, Linux, and MacOS (see Figure 2).
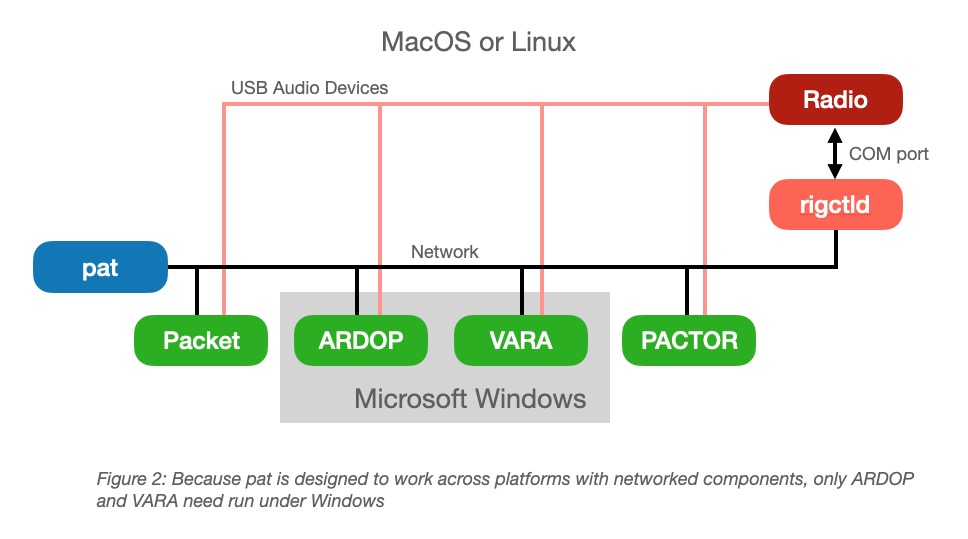
The result of this modular architectural decision is that only those components that require Windows need to be configured to run with Crossover. Because implementations of Packet, PACTOR and most other protocols are available on Linux and MacOS, the only modules we end up having to configure for use in a Windows environment are ARDOP and VARA. Further, pat understands how to control the radio using hamlib’s rigctld, a cross-platform, network-based rig control server that supports a far greater number of transceiver types than Winlink Express does. And of course, moving the serial port control to MacOS native rigctld means that we avoid all the issues of serial ports under Windows 11 for ARM.
Installation
Installing pat and all its necessary components isn’t terribly difficult, but it requires a lot of steps. I’ll try to show screenshots of all the necessary bits as we go.
Requirements
Before we begin, make sure you have the following required pieces. While other configurations may work, I can only really provide guidance on my tests with these components.
- An M1, M2, or M3-based Mac running MacOS 11.1 (Big Sur) or newer.1 You must be running MacOS 11.1 or better to use the version of Crossover that runs on the Mac M1/M2/M3 processors and knows how to run Intel binaries. The VARA and ARDOP modems are compiled for Intel processors, so you will need this capability.
- A copy of
Crossover 21or newer. As noted above, you need a version of Crossover that works on the ARM Macs, and Crossover 21 is the oldest version that does so. - An installation of
homebrew.homebrew(https://brew.sh) is a package manager for MacOS. Homebrew is the easiest way to install thehamliblibraries which support control of roughly 280+ radios. - A USB-connected radio. I built this configuration to work with my Icom IC-7100, which provides both audio and control over a single USB port. While you can certainly configure the pat and its modems for connecting through a SignalLink device or equivalent, that process is beyond the scope of this document.
Step-by-step Installation Instructions
The installation plan requires the following steps.
- Download and install Crossover.
- Download and import my Winlink-drivers Crossover bottle.
- Download a copy of
patfrom https://getpat.io. - Install
hamlibusing homebrew if you don’t already have it.
I’ll walk you through each step in the sub-sections below.
Step 1: Download and Install Crossover
Crossover is a commerical version of the WINE project that has user interface enhancements that allow it to be used by non-developers. It is offered and maintained by Codeweavers. You can download the Mac version from https://www.codeweavers.com/crossover. You can install and use the full commercial version of Crossover for free for 14 days, which should be enough time for you to test out your Winlink configuration and decide if you want to buy the commercial version.
Step 2: Download My Winlink Internet Drivers Crossover Bottle
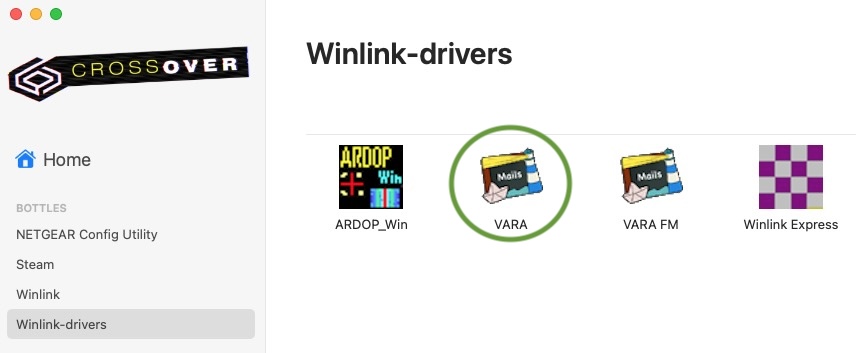
Crossover bottles are bundles of installed programs that run together in a common Windows environment. I’ve created a bottle that contains the Winlink Express, VARA, VARA FM, and ARDOP programs all installed, but not yet configured. You can download that bottle from my web site here.
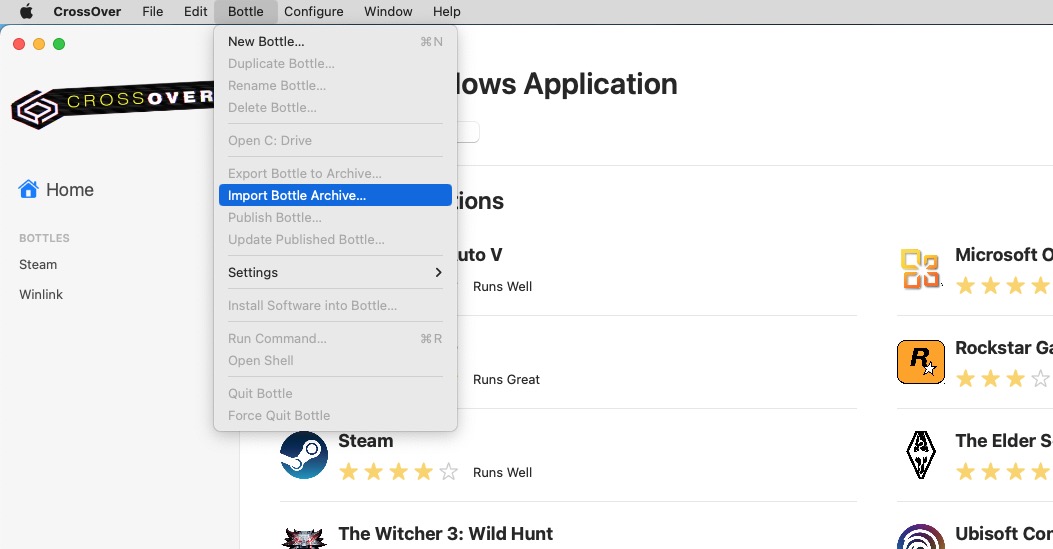
Once you’ve downloaded the bottle, click Bottle > Import Bottle Archive… as shown in Figure 3.
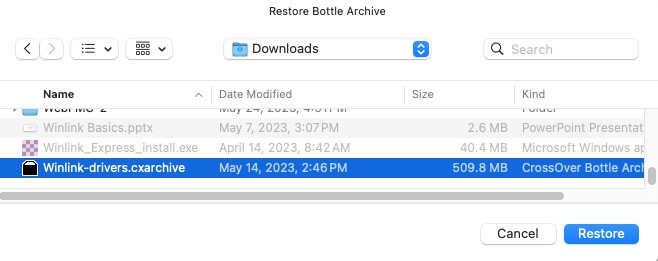
Next select the file Winlink-drivers.cxarchive as shown in Figure 4.
You should end up with a new bottle named Winlink with 4 programs in it as shown in Figure 5.
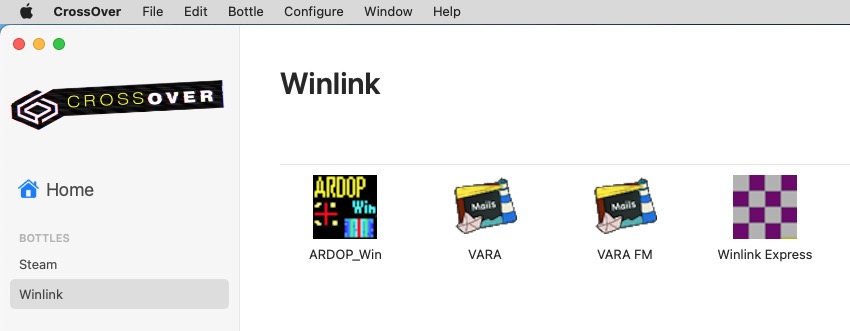
All of these programs will now run under Crossover on your Mac. Should you wish to run Winlink Express with only Telnet sessions using the internet, you can launch and configure it now. However, we want to be able to run Winlink sessions over the air, so we’ll continue installing the rest of the components we need.
Step 3: Install a copy of pat from https://getpat.io.
Click the Download button on https://getpat.io and install pat_0.14.1_darwin_amd64.pkg or whatever the latest version for MacOS is. Don’t worry about it being an Intel binary; it runs just fine using Rosetta 2 on a M1/M2/M3 Mac. Once you have it downloaded, install it by double-clicking on the file you downloaded.
Step 4: Install hamlib using homebrew if you don’t already have it.
The easiest way to install the hamlib is to have homebrew install it for you. homebrew runs from the MacOS command line, so you’ll need to launch Terminal.app on your Mac; it typically resides in /Applications/Utilities. Once you have a Terminal window open, enter the following command:
StudioMac.lan ~% brew install hamlibHomebrew should come back with something like the following:
==> Fetching hamlib
==> Downloading https://ghcr.io/v2/homebrew/core/hamlib/manifests/4.5.5
Already downloaded: /Users/chowe/Library/Caches/Homebrew/downloads/aaeb4f23e32684cc5e2e54ce0ba7052a398453b420f0486b6495820fe5a2edd9--hamlib-4.5.5.bottle_manifest.json
==> Downloading https://ghcr.io/v2/homebrew/core/hamlib/blobs/sha256:273a45da72d9e209e76bd20c4b699207f6fea5b6483dfa2f3a6f5837ed596ce9
Already downloaded: /Users/chowe/Library/Caches/Homebrew/downloads/7a6c7a45c26fb40c6dca473992bba5d290e228952d2eeaecfdfdc218f29e921d--hamlib--4.5.5.arm64_ventura.bottle.tar.gz
==> Pouring hamlib--4.5.5.arm64_ventura.bottle.tar.gz
🍺  /opt/homebrew/Cellar/hamlib/4.5.5: 59 files, 23.1MB
==> Running `brew cleanup hamlib`...
Disable this behaviour by setting HOMEBREW_NO_INSTALL_CLEANUP.
Hide these hints with HOMEBREW_NO_ENV_HINTS (see `man brew`).
StudioMac.lan ~%
System Configuration
OK, now we have all the pieces we need to make our Winlink client work. However, before we go there, we should plan how all the components talk to each other.
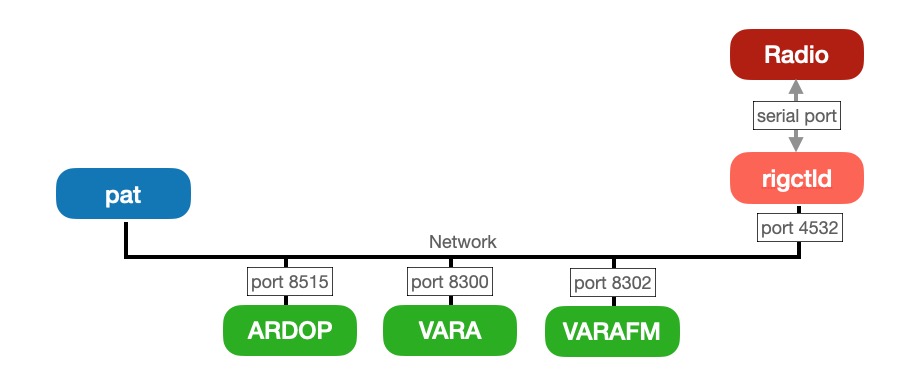
The secret to this system is that all the software programs talk to each other using network ports. Ports are simple addresses where programs can provide network services. By convention, the various radio and modem services we’re going to need typically use the following ports (see Figure 6):
- 8515: ARDOP. When
pattries to make an ARDOP connection, it sends the connection request on port 8515 by default. - 8300: VARA HF. Similarly, the HF version of VARA is typically configured for port 8300.
- 8302 VARA FM. For VHF/UHF Vara connections using VARA FM, the default port is 8302.
- 4532: rigctld. Finally, we control our radio through the rig control daemon, whose port number is usually 4532.
Keep these port numbers in mind because we’ll need to know all of them to configure pat properly.
Configure pat to talk to rigctld (which is part of hamlib), VARA, and ARDOP
Pat runs from the MacOS command line, so you’ll need to launch Terminal.app on your Mac; it typically resides in /Applications/Utilities. Once you have a Terminal window open, enter the following commands:
% export EDITOR=/usr/bin/nano
% pat configure
pat will then pop up a window for you to edit it’s configuration file, config.json.
Now we want to edit this configuration file to reflect your station parameters and the ports shown in Figure 6. Figure 7 shows a simplified version of the completed configuration file without all the other protocols we’re not going to use in this example.
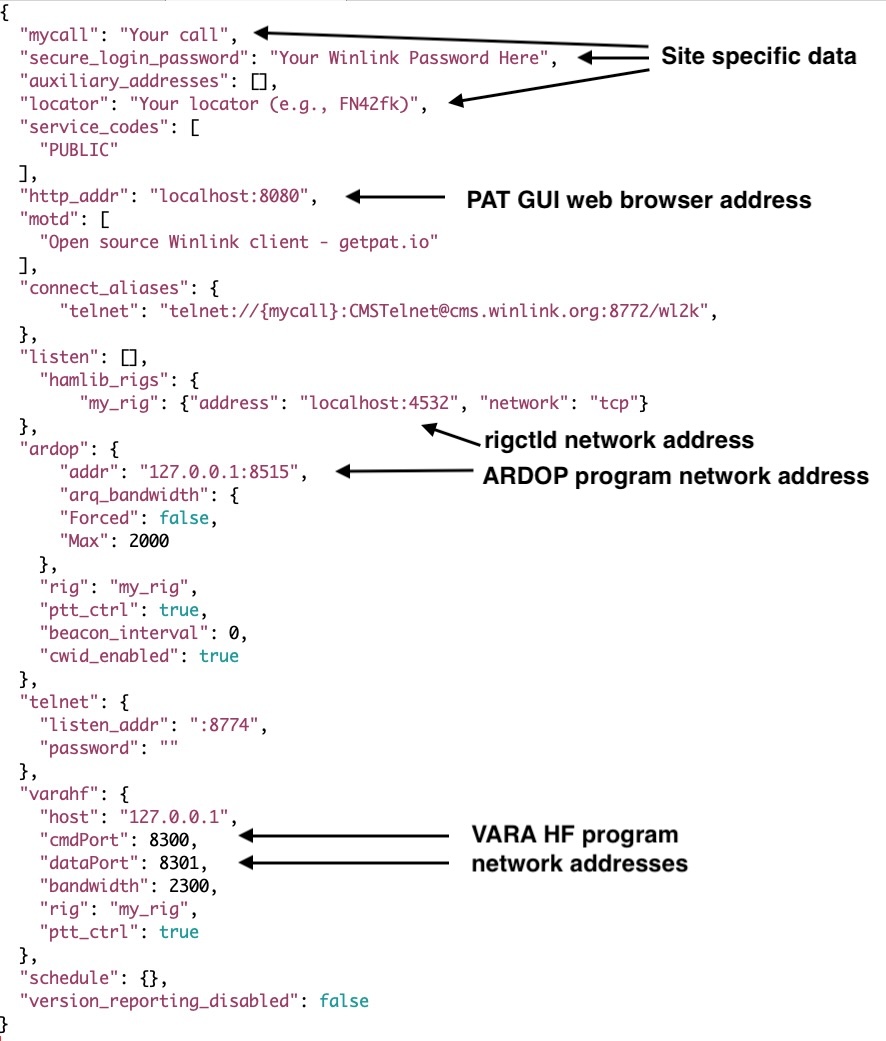
This configuration file assumes that you are running all these programs on the Mac on which you are running pat. If that is the case, you can use the network addresses 127.0.0.1 and localhost interchangeably.
Once you’ve edited the config.json file appropriately, exit the nano editor with control-X.
At this point, pat is ready to run. However, we still have to configure the audio path between the modems and the radio.
Configure VARA
Because VARA is a PC program, it needs to be run under Crossover. Double-click on Crossover in your Applications folder, and then double-click on the VARA icon in the Winlink-drivers bottle.
After a bit of a wait, you should then see the VARA GUI as shown in Figure 9.
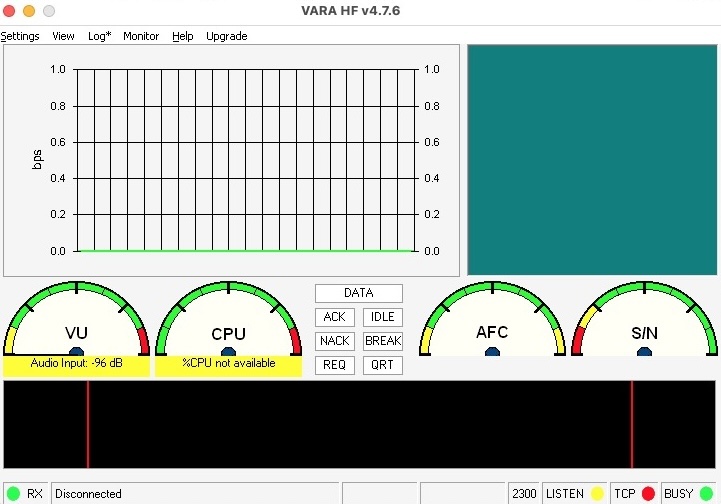
Click on the Settings menu and select Soundcard… to pop up the audio settings panel as shown below in Figure 10.
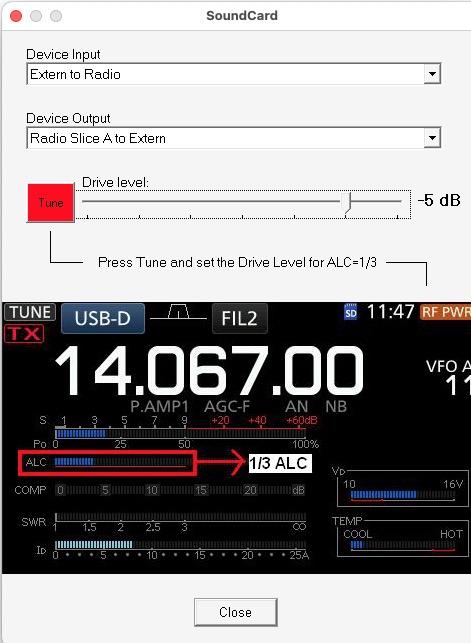
You should be able to select the audio paths to and from your rig using the pull-down menu selections at the top of this dialog box. If your rig sends and receives its audio via USB, as is common on modern rigs like the Icom IC-7300, the device you are looking for will have a name like USB Audio CODEC or the like. If your rig interfaces in some other way, you may have to try other device names.
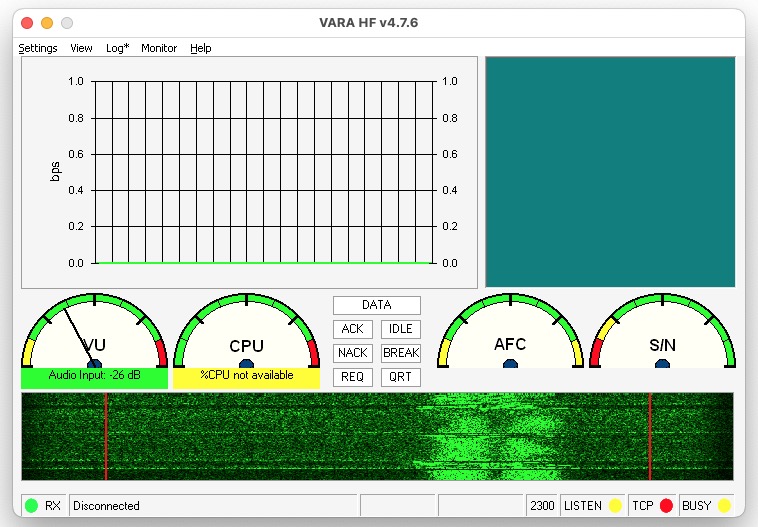
Once you close the Soundcard dialog box, you should start to see signals on the VARA waterfall as shown below in Figure 11.
Should you have a license key for VARA that permits high-speed operation, select VARA Setup from the Settings menu and enter the license key into the resulting dialog box.
Configure ARDOP
You configure the ARDOP audio interface in much the same way as you do VARA. You begin again at the Crossover home screen and double-click on ARDOP_Win. That will pop up the ARDOP GUI shown in Figure 12 below.
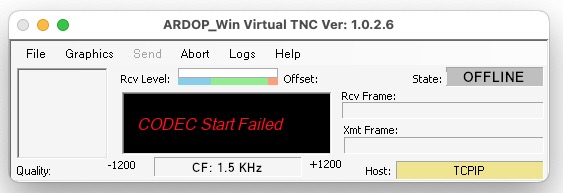
Select Virtual TNC Setup from the File menu to load the configuration menu. You then will can enter your call sign in the Call Sign field and select your audio devices from the pulldowns labelled Sound Card Capture Device and Sound Card Playback Device as shown in Figure 13.
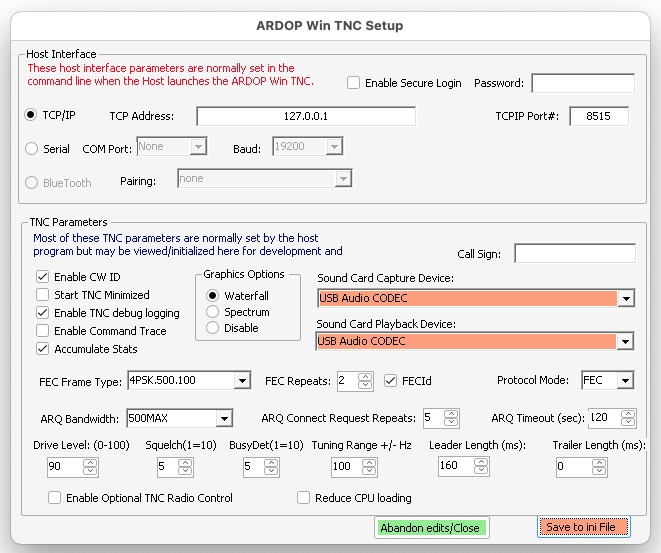
Once you’ve correctly set the audio devices and your call sign, click Save to ini File and wait for ARDOP to relaunch. At that point, you should now be able to see audio signals in the ARDOP waterfall display.
Configuring ‘rigctld’ to Control Your Radio
The final step required is to set up the rigctld daemon for your specific radio. You launch rigctld from the MacOS Terminal command line program. A typical command to start rigctld for an Icom 7300 is shown below:
% rigctld -m 3073 -r /dev/usbxxxx -t 4532 -vvvHere’s how to read that command:
- rigctld is the name of the rig control daemon
- -m 3073 says to use the CAT commands for an IC-7300
- -r /dev/usbxxxx says to talk to the IC-7300 on this USB port. You can get a list of your USB devices by the command
ls dev/tty\* \| grep usb. - -t 4532 says to connect to rigctld on port 4532.
- -vvv says to log what rigctld to your screen very very verbosely (vvv).
You can get full information on all the many options to rigctld from its manual page, which is available by typing man rigctld in the terminal.
Running the Complete pat System and Making Your First Winlink Connections
Once you’ve made it through all this, the process for actually running pat and making Winlink connections goes as follows:
- Turn on your radio and tune to a band that you have an antenna for.
- Select upper sideband mode and USB audio input on your radio. Some radios refer to this as USB-D or DIGU mode.
- Run
rigctldfrom the Terminal as shown above. - Run Crossover and double-click on whichever modem you want to use (you can run both simultaneously if you wish)
- Start
patin web server mode using the Terminal command,pat http. - Open your web browser to the address
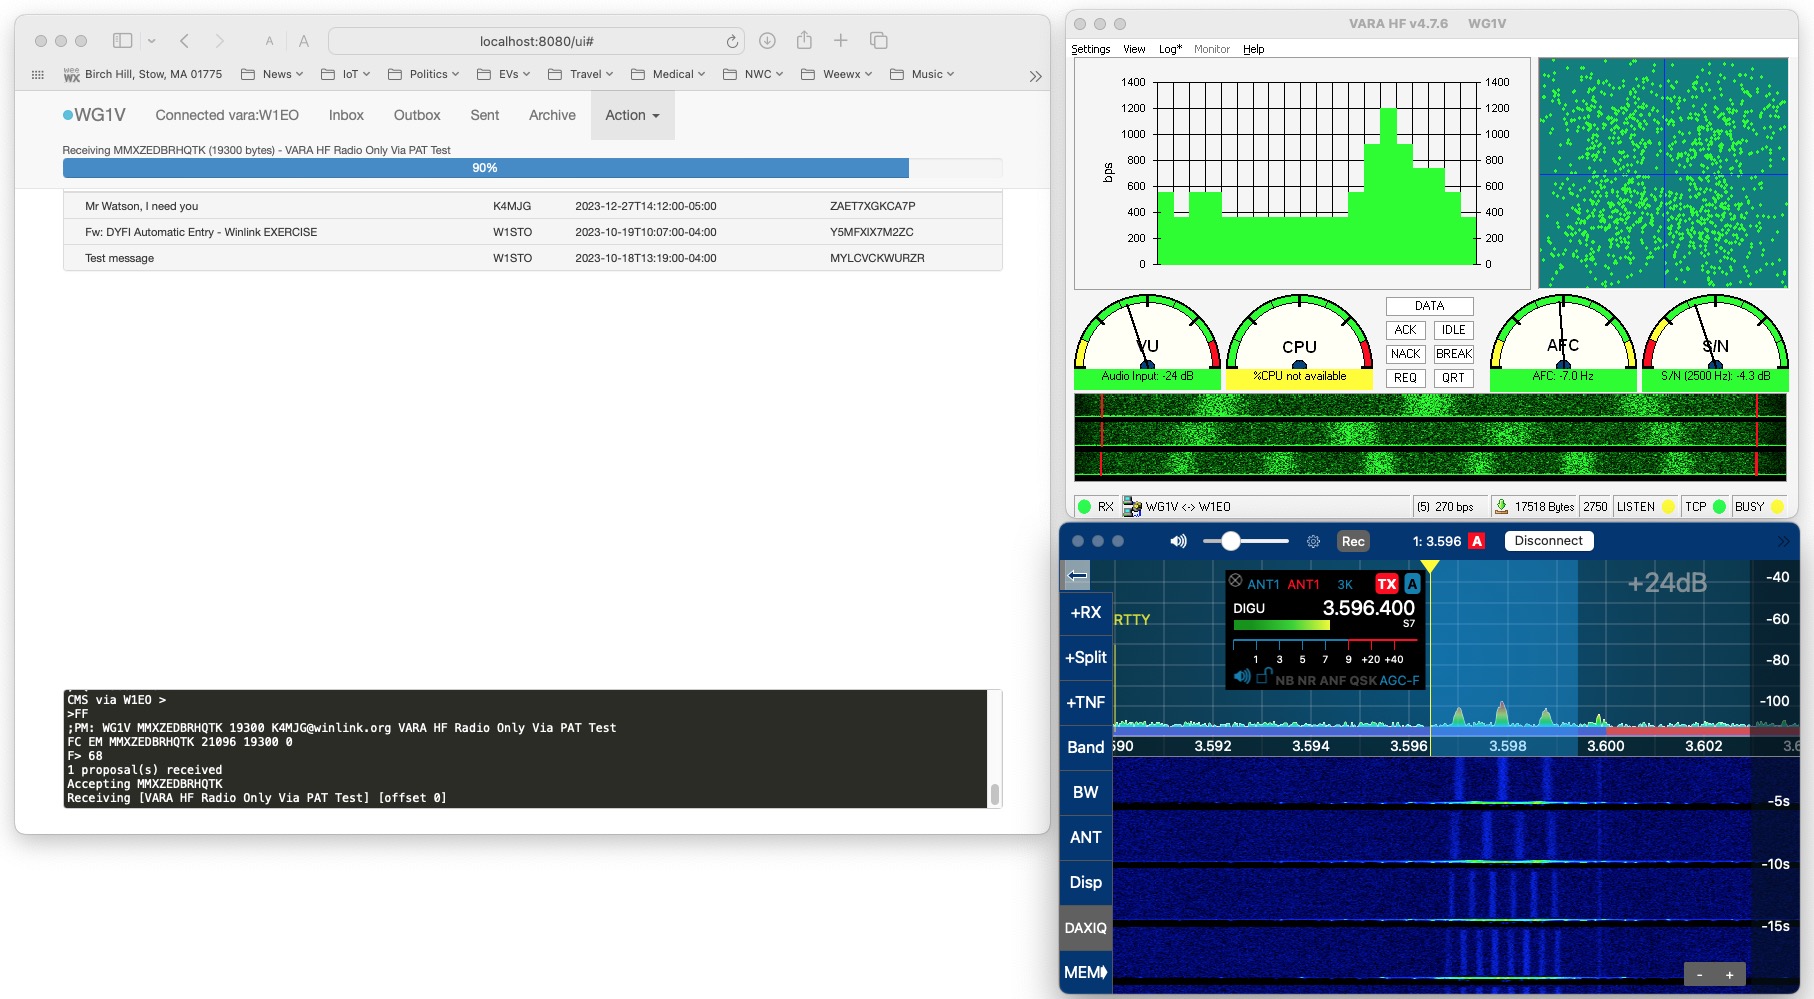
http://localhost:8080. You should then see thepatGUI screen shown in Figure 14 below, minus the left over emails I show in my inbox.
 Click on the Action menu, and there you’ll be offered the opportunity to compose new emails for sending or to connect to servers. If you click on Connect…, you’ll be shown the screen in Figure 16.
 This screen allows you to manually type in all the parameters you need to make a connection to the Winlink network.
Making a Telnet connection.
The simplest possible connection is one that doesn’t involve your radio at all, but that will test your pat configuration. Click on the dropdown menu with the (select alias) inside it, and you should see an alias for telnet. This alias was originally configured in your pat config.json file and if you select it, all the other parameters necessary to make a connection over the network to winlink.org should automatically fill in as shown in Figure 17 below.
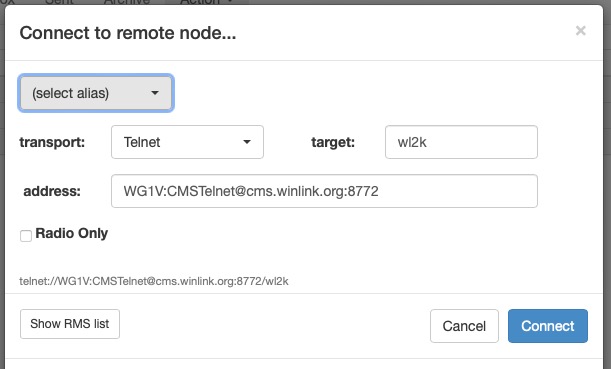
If those all look reasonable, click the Connect button at the bottom, and you should be connected to winlink.org and pat will send and receive any messages you may have queued.
Making a Radio connection.
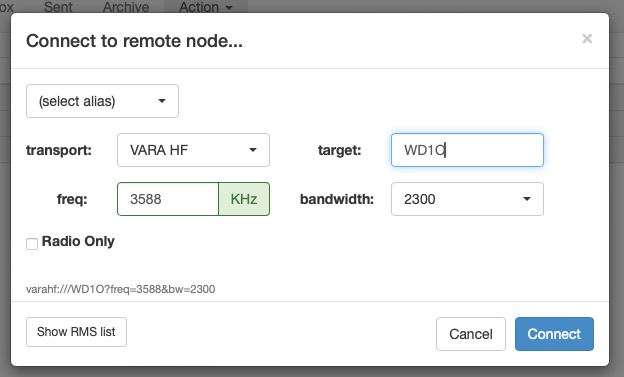
Assuming you can make telnet connections, now it’s time to test out all the other components of the system. Instead of typing in all the parameters for a connection, I recommend clicking on the box labelled Show RMS list. That will show a list of stations, their frequencies, their protocols, and their distances from you as shown in Figure 18 below:
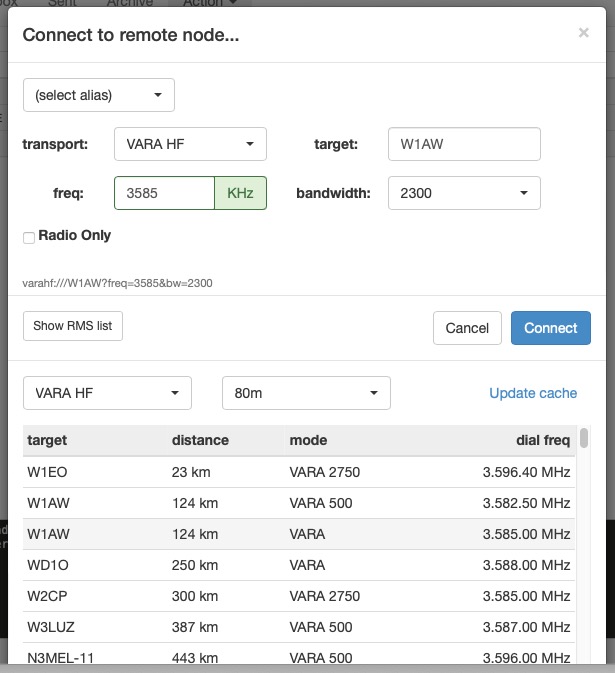
If you single-click on any station in the list, pat should automatically tune your radio to the appropriate frequency, but won’t make the connection until you click Connect. If your radio properly tunes to the frequency shown, you now know that rigctld properly configured for your rig.
At this point, you should check the VARA or ARDOP waterfalls to see if they are displaying whatever audio they are hearing. If they remain black, something isn’t configured or connected correctly. However, if they are showing signals, now is the time to try hitting the Connect button.
Once you hit Connect, the log at the bottom of the pat browser window should show actions that pat is taking to make connections. Your radio should begin alternating between transmitting and listening for answers. If it does, then you have at least the beginnings of a working Winlink system on an M1/M2/M3 Mac!
What If It Doesn’t Work?
Debugging this type of complex system is really beyond the scope of this blog post. However, let me give you some ideas for how you might continue testing your system and possibly get it to connect to other stations.
- Start with telnet. The telnet test doesn’t use your radio, but does test whether
patis properly configured and whether your user name and password for Winlink are valid. Write some test emails and try sending them to your Internet home address. Once you have that working, you can then move on to debugging the other bits of the system. - Ensure your rig is in upper sideband digital mode. Winlink always uses upper sideband modulation, regardless of band. You may also need to do something to select the USB audio input to get the signal from your computer to the radio. Some radios refer to this as USB-D or DIGU mode. Also, ensure that you have any audio equalization disabled.
- Look at the pat log and the
rigctldoutput. Both programs log their activities, so check their outputs to see if they are doing what you expect and if they are generating any errors. - Try another station and/or another band. Not all stations in the list are running Winlink all the time, nor is propagation always going to allow you to connect to every station. Start with stations that are close enough that you can hit them with ground wave and only target far away stations once you have everything working.
- Check to make sure your rig is keying up to transmit.
Patmay think it is transmitting, but if you don’t have push-to-talk capability on your CAT interface, you may need to tellrigctldto use another device for PTT. Check therigctldmanual for how to do this. Again,rigctldlogs every change of state for PTT, so you can check therigctldconsole output to see if PTT requests are getting through. - If VARA doesn’t work, try ARDOP (and vice versa). The two modems have different signal characteristics, so one may work when the other doesn’t.
Conclusion
Clearly, running pat on a M1/M2/M3 Macintosh takes a bit of work. Winlink Express and the VARA and ARDOP modems really only work in a Windows and Intel processor environment. What we’ve done here is to configure pat, a cross-platform Winlink client to use network connections to communicate with VARA and ARDOP modems and with rigctld, a daemon that controls your radio. We simultaneously run the VARA and ARDOP modems under Crossover, which simulates an Intel-based Windows environment for those PC-only programs. I plan to write a follow-up blog post on how to launch and use pat with these components. However, for the moment, I hope this how-to document provides enough information and detail for determined hams with Macs to get going with pat and try to get on the air with Winlink.
Carl WG1V
Footnotes
If you own an Intel-based Mac (I still have a 2012 Macbook Pro that still works great, so they still are out there), you have some advantages. You can run Winlink Express under the Windows in a Parallels virtual machine, and it will work properly. You also have a greater choice of which Crossover or WINE versions you use because you don’t require instruction set translation. Regardless, I believe that the process described in this document will work just fine on an Intel-based Mac.↩︎